How to configure SPF, DKIM, DMARC + TLS on Postfix Centos 7
In order to maximize the delivery of your mailing lists, you must fulfill all the requirements and conditions of the mail services, as well as configure all the necessary set of keys, records and settings on your mail server.
Introduction
In order to maximize the delivery of your mailing lists, you must fulfill all the requirements and conditions of the mail services, as well as configure all the necessary set of keys, records and settings on your mail server.
The main tools that can improve the delivery of your letters are the following:
- DKIM
- DMARC
- SPF
- TLS
Now let's tune each one.
All commands in this manual are generated for the example.com domain. Be sure to replace this domain with yours.
DKIM install
Install opendkim via simple command:
yum install opendkim -y
Generate keys
Now generate public and private keys:
opendkim-genkey --restrict --nosubdomains --selector=default --domain=example.com --bits=2048 --directory=/etc/opendkim/keys
-
selector - This parameter is responsible for the name of the key with which mail will be subscribed. In order for mail to be signed by the main domain example.com, we specify the selector "default".
-
domain - this is the domain name.
-
bits - key strength, recommend >=2048
Next, lets rename files:
mv /etc/opendkim/keys/default.private /etc/opendkim/keys/example.com.private
mv /etc/opendkim/keys/default.txt /etc/opendkim/keys/example.com.txt
and set chmod:
chown root:opendkim /etc/opendkim/keys/*
chmod 640 /etc/opendkim/keys/*
So, keys was succesfully generated, now we can setup DKIM.
DKIM setup
Now edit KeyTable file and add new line with our domain, file should be looks like:
# OPENDKIM KEY TABLE
# To use this file, uncomment the #KeyTable option in /etc/opendkim.conf,
# then uncomment the following line and replace example.com with your domain
# name, then restart OpenDKIM. Additional keys may be added on separate lines.</em>
default._domainkey.example.com example.com:default:/etc/opendkim/keys/example.com.private
Then, edit SigningTable file and add new line with our domain, file must be looks like:
# OPENDKIM SIGNING TABLE
# This table controls how to apply one or more signatures to outgoing messages based
# on the address found in the From: header field. In simple terms, this tells
# OpenDKIM "how" to apply your keys.
# To use this file, uncomment the SigningTable option in /etc/opendkim.conf,
# then uncomment one of the usage examples below and replace example.com with your
# domain name, then restart OpenDKIM.
# WILDCARD EXAMPLE
# Enables signing for any address on the listed domain(s), but will work only if
# "refile:/etc/opendkim/SigningTable" is included in /etc/opendkim.conf.
# Create additional lines for additional domains.
#*@example.com default._domainkey.example.com
# NON-WILDCARD EXAMPLE
# If "file:" (instead of "refile:") is specified in /etc/opendkim.conf, then
# wildcards will not work. Instead, full user@host is checked first, then simply host,
# then user@.domain (with all superdomains checked in sequence, so "foo.example.com"
# would first check "user@foo.example.com", then "user@.example.com", then "user@.com"),
# then .domain, then user@*, and finally *. See the opendkim.conf(5) man page under
# "SigningTable" for more details.</em>
*@example.com default._domainkey.example.com
Edit TrustedHosts file and add make it like this:
# OPENDKIM TRUSTED HOSTS
# To use this file, uncomment the #ExternalIgnoreList and/or the #InternalHosts
# option in /etc/opendkim.conf then restart OpenDKIM. Additional hosts
# may be added on separate lines (IP addresses, hostnames, or CIDR ranges).
# The localhost IP (127.0.0.1) should always be the first entry in this file.
127.0.0.1
::1
Modify opendkim.conf file:
PidFile /var/run/opendkim/opendkim.pid
Mode sv
Syslog yes
SyslogSuccess yes
LogWhy yes
UserID opendkim:postfix
Socket local:/var/run/opendkim/opendkim.sock
UMask 000
SendReports no
SoftwareHeader  yes
Canonicalization relaxed/simple
MinimumKeyBits 2048
OversignHeaders From
SigningTable refile:/etc/opendkim/SigningTable
ExternalIgnoreList refile:/etc/opendkim/TrustedHosts
KeyTable refile:/etc/opendkim/KeyTable
InternalHosts refile:/etc/opendkim/TrustedHosts
Now we can restart OpenDKIM and check status:
systemctl restart opendkim && systemctl status opendkim
The correct result is:
● opendkim.service - DomainKeys Identified Mail (DKIM) Milter
   Loaded: loaded (/usr/lib/systemd/system/opendkim.service; disabled; vendor preset: disabled)
   Active: active (running) since Fri 2019-08-30 15:01:13 MSK; 6ms ago
     Docs: man:opendkim(8)
           man:opendkim.conf(5)
           man:opendkim-genkey(8)
           man:opendkim-genzone(8)
           man:opendkim-testadsp(8)
           man:opendkim-testkey
           http://www.opendkim.org/docs.html
  Process: 16434 ExecStart=/usr/sbin/opendkim $OPTIONS (code=exited, status=0/SUCCESS)
 Main PID: 16435 (opendkim)
   CGroup: /system.slice/opendkim.service
           └─16435 /usr/sbin/opendkim -x /etc/opendkim.conf -P /var/run/opendkim/opendkim.pid
Aug 30 15:01:13 systemd[1]: Starting DomainKeys Identified Mail (DKIM) Milter...
Aug 30 15:01:13 systemd[1]: Started DomainKeys Identified Mail (DKIM) Milter.
Aug 30 15:01:13 opendkim[16435]: OpenDKIM Filter v2.11.0 starting (args: -x /etc/opendkim.conf -P /var/run/opendkim/opendkim.pid)
Now we should configure Postfix to work with DKIM, add with section to bottom of config file:
/etc/postfix/main.cf
...
### OpenDKIM
milter_default_action = accept
milter_protocol = 2
smtpd_milters = unix:/var/run/opendkim/opendkim.sock
non_smtpd_milters = $smtpd_milters
So, restart Postfix and check it status:
systemctl restart postfix && systemctl status postfix
The correct result is:
● postfix.service - Postfix Mail Transport Agent
   Loaded: loaded (/usr/lib/systemd/system/postfix.service; enabled; vendor preset: disabled)
   Active: active (running) since Fri 2019-08-30 15:07:16 MSK; 5ms ago
  Process: 16451 ExecStop=/usr/sbin/postfix stop (code=exited, status=0/SUCCESS)
  Process: 16468 ExecStart=/usr/sbin/postfix start (code=exited, status=0/SUCCESS)
  Process: 16464 ExecStartPre=/usr/libexec/postfix/chroot-update (code=exited, status=0/SUCCESS)
  Process: 16461 ExecStartPre=/usr/libexec/postfix/aliasesdb (code=exited, status=0/SUCCESS)
 Main PID: 16540 (master)
   CGroup: /system.slice/postfix.service
           ├─16540 /usr/libexec/postfix/master -w
           ├─16541 pickup -l -t unix -u
           └─16542 qmgr -l -t unix -u


Aug 30 15:07:16 my.srv systemd[1]: Stopped Postfix Mail Transport Agent.
Aug 30 15:07:16 my.srv systemd[1]: Starting Postfix Mail Transport Agent...
Aug 30 15:07:16 my.srv postfix/postfix-script[16538]: starting the Postfix mail system
Aug 30 15:07:16 my.srv postfix/master[16540]: daemon started -- version 2.10.1, configuration /etc/postfix
Aug 30 15:07:16 my.srv systemd[1]: Started Postfix Mail Transport Agent.
Okay, DKIM and Postfix services installed and configured, and we can modify DNS of website.
DNS setup
Open txt file that was generated by command:
cat /etc/opendkim/keys/example.com.txt
/etc/opendkim/keys/example.com.txt
default._domainkey      IN      TXT     ( "v=DKIM1; k=rsa; t=s; s=email; "
          "p=MII......FwvTQIjV"
          "I3x...AQAB" )  ; ----- DKIM key default for example.com
Now we can add this record to our DNS manager.
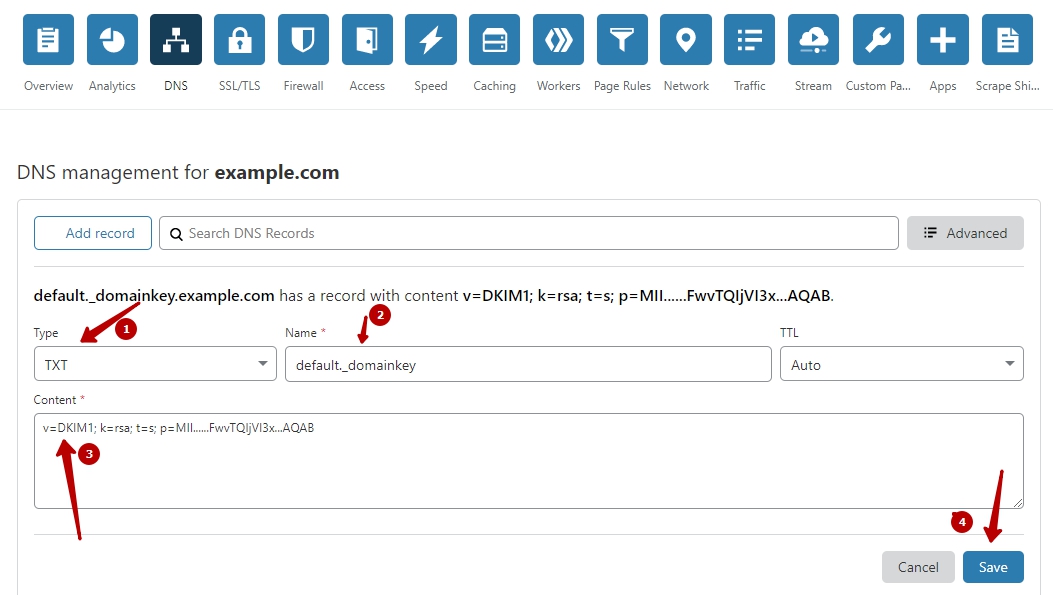
For example, you use CloudFlare.
Go to your CloudFlare account, and click on DNS section, then click "Add record" button:

Copy and paste your site key like on screenshot:
Wait about 20 minutes, and you can check that is DKIM works.